Difference between revisions of "Fallout Protection For Homes With Basements"
AzraelBrown (talk | contribs) |
AzraelBrown (talk | contribs) |
||
| Line 84: | Line 84: | ||
Fallout Shelter Plans A through F which follow are so simple that you may be tempted to construct them from the drawings in this booklet -- and in many cases a thoroughly experienced "do-it-yourselfer" could do this. However, it requires very careful calculation of materials and fasteners to safely hold the heavy materials to be placed overhead; therefore, it is strongly recommended that you build from the detailed plans and lists of materials which are available by mailing the post card enclosed with this booklet. | Fallout Shelter Plans A through F which follow are so simple that you may be tempted to construct them from the drawings in this booklet -- and in many cases a thoroughly experienced "do-it-yourselfer" could do this. However, it requires very careful calculation of materials and fasteners to safely hold the heavy materials to be placed overhead; therefore, it is strongly recommended that you build from the detailed plans and lists of materials which are available by mailing the post card enclosed with this booklet. | ||
| − | ===PERMANENT SHELTER== | + | ===PERMANENT SHELTER=== |
'''Ceiling Modification To Basement -- PLAN A''' | '''Ceiling Modification To Basement -- PLAN A''' | ||
| Line 98: | Line 98: | ||
A significant amount of protection can be achieved merely by inserting heavy material in the ceiling above the best corner if this plan is recommended for your home. If this plan is not indicated on the back cover of your booklet, it can still be used by providing two additional masonry walls to enclose the corner of the basement. Fixtures and installation of ceiling tiles or walls will increase the cost a bit, but you will be able to achieve a significant amount of protection without interfering with the functions of the basement. | A significant amount of protection can be achieved merely by inserting heavy material in the ceiling above the best corner if this plan is recommended for your home. If this plan is not indicated on the back cover of your booklet, it can still be used by providing two additional masonry walls to enclose the corner of the basement. Fixtures and installation of ceiling tiles or walls will increase the cost a bit, but you will be able to achieve a significant amount of protection without interfering with the functions of the basement. | ||
| − | Because the basement area is almost all belowground level, you can increase the fallout protection by installing bricks or solid concrete blocks between the wood joists in the best corner. The filler materials are supported by sheets of plywood fastened to the floor joists. A beam and screw jack column may be needed to keep the floor joists from bending too much. A carpenter can tell you if this is needed. | + | [[Image:Fallout_Protection_For_Homes_With_Basements-Illustration_7.jpg|180px|right]]Because the basement area is almost all belowground level, you can increase the fallout protection by installing bricks or solid concrete blocks between the wood joists in the best corner. The filler materials are supported by sheets of plywood fastened to the floor joists. A beam and screw jack column may be needed to keep the floor joists from bending too much. A carpenter can tell you if this is needed. |
| − | Plywood sheets (2' x 8' x ½" cut to fit) should be securely fastened to the joists using 2 inch, #8 screws 10 inches apart. Bricks or blocks are then packed as tightly as possible into the openings between the two joists. Be sure to fill as much space as possible. To get the most protection out of this improvement, one-quarter of the ceiling over the best corner should be filled with bricks or solid concrete blocks. To obtain detailed plans, see page 24. | + | [[Image:Fallout_Protection_For_Homes_With_Basements-Illustration_8.jpg|180px|left]] |
| + | Plywood sheets (2' x 8' x ½" cut to fit) should be securely fastened to the joists using 2 inch, #8 screws 10 inches apart. Bricks or blocks are then packed as tightly as possible into the openings between the two joists. Be sure to fill as much space as possible. To get the most protection out of this improvement, one-quarter of the ceiling over the best corner should be filled with bricks or solid concrete blocks. | ||
| + | [[Image:Fallout_Protection_For_Homes_With_Basements-Illustration_9.jpg|180px|right]] | ||
| + | To obtain detailed plans, see page 24. | ||
In fastening the plywood sheets to the joists, nailing is not enough. Nails will pull loose. Use two-inch screws in the banner shown here. | In fastening the plywood sheets to the joists, nailing is not enough. Nails will pull loose. Use two-inch screws in the banner shown here. | ||
| + | <br style="clear: both;"> | ||
| + | ===PERMANENT SHELTER=== | ||
| + | '''Alternate Ceiling Modeification To Basement PLAN B''' | ||
| + | |||
| + | '''NOTE: If too much of the basement wall is exposed, this plan will not provide sufficient protection and should not be used. The [[Fallout_Protection_For_Homes_With_Basements#Back_Cover|back cover of this booklet]] will indicate if this plan is recommended for YOUR home.''' | ||
| + | |||
| + | [[Image:Fallout_Protection_For_Homes_With_Basements-Illustration_10.jpg|400px|center]] | ||
| + | |||
| + | If you need a minimum shelter which will not interfere with an existing corner of your basement, try this plan. It is so arranged that the shelter area can be enlarged at either end, depending upon the size of the basement. | ||
| + | |||
| + | This type of construction does not require a beam and screw-jack column to support the joists. The protected area can be used as a workshop, recreation room, pantry area, laundry room, or part of a family room. With ceiling tile covering the plywood panels, no one would recognize the area as a fallout shelter. Since the objective is to provide as much overhead mass as possible, the heaviest weight of solid brick or block (placed on an end if possible) should be used. If this plan is not indicated on the [[Fallout_Protection_For_Homes_With_Basements#Back_Cover|back cover of this booklet]], it can still be used by providing two additional masonry walls to enclose the corner of the basement. | ||
| + | |||
| + | Wooden joists (2" x 12"), notched at the ends for bearing, are installed between existing floor joists. Plywood panels are then fastened to the 2" x 12" joists. | ||
| + | <br style="clear: both;"> | ||
| + | Brick or concrete blocks are packed into the spaces between the 10" and 12" joists; they are supported by the plywood panels. | ||
| + | <br style="clear: both;"> | ||
| + | |||
| + | This basement floor plan shows how the additional joists and the filler material might be used in the corner of the basement which furnishes the best fallout protection. To get the most protection out of this improvement, one-quarter of the basement ceiling should be filled with bricks or solid concrete blocks. | ||
| + | |||
| + | To obtain detailed plans, see page 24. | ||
===Back Cover=== | ===Back Cover=== | ||
[[Image:Backcover-med.jpg|500px|center]] | [[Image:Backcover-med.jpg|500px|center]] | ||
Revision as of 13:01, 14 March 2008
Fallout Protection For Homes With Basements is a 28-page pamphlet produced by the U.S Government during the Cold War, providing tips and instructions on how to harden an existing basement against radiation and fallout resulting from a nuclear explosion.
You can purchase a reprint edition from The Infomercantile at our LuLu.com Store.
Contents
- 1 Book Contents
- 1.1 THE FALLOUT PROTECTION IN YOUR HOME
- 1.2 WHAT IS RADIOACTIVE FALLOUT?
- 1.3 HOW CAN YOUR PROTECTION BE IMPROVED?
- 1.4 THE FALLOUT SHELTER SYSTEM
- 1.5 HOW MUCH PROTECTION DOES YOUR BASEMENT PROVIDE AGAINST RADIOACTIVE FALLOUT?
- 1.6 WHICH IS THE BEST CORNER OF YOUR BASEMENT?
- 1.7 WHAT ABOUT THE CENTER OF THE BASEMENT?
- 1.8 STEPS YOU CAN TAKE TO INCREASE YOUR FALLOUT PROTECTION
- 1.9 A WORD OF CAUTION TO THE HOME HANDY MAN
- 1.10 PERMANENT SHELTER
- 1.11 PERMANENT SHELTER
- 1.12 Back Cover
Book Contents
THE FALLOUT PROTECTION IN YOUR HOME
This booklet is about fallout protection. It will tell you what radioactive fallout is and how you can improve your protection against it if this country were ever attacked with nuclear weapons. But first of all, because your home has a basement you already have some fallout protection. Let's see what that protection is:
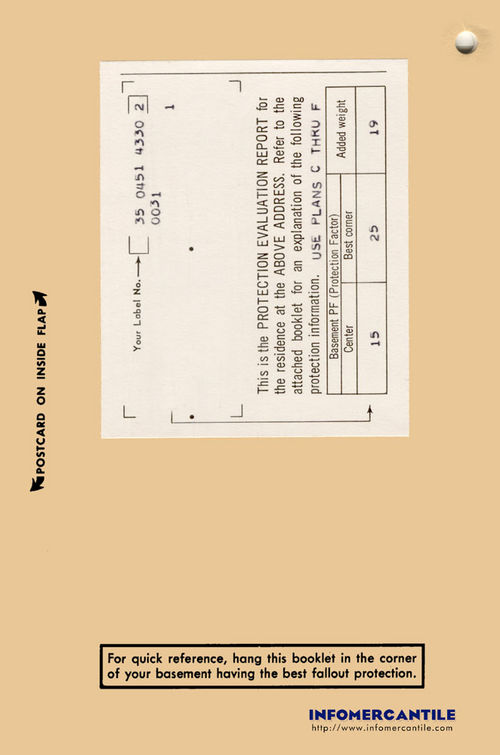
On the back cover of this booklet a box like this appears:
Entered in the space labeled Basement "PF" are two numbers which tell you the fallout protection that was calculated for the "center" of your basement and the "best corner" of your basement. Information on the box labeled "Added Weight", is on page 20 of this booklet.
The "PF" above the box stands for "Protection Factor." Before going into the details of what your "Protection Factor" numbers mean, let's talk for a moment about what fallout is.
WHAT IS RADIOACTIVE FALLOUT?
When a nuclear weapon is exploded close to the ground, dirt and other debris are drawn up into the mushroom cloud and pick up the radioactivity created by the explosion. The heaviest pieces of dirt and debris drop back to earth within a few miles of the explosion. But the lighter pieces are carried by the winds for many miles before drifting back to earth.
These radioactive particles are called "fallout." Any part of the United States might be covered with deadly or dangerous amounts of radioactive fallout, depending on which way the winds were blowing and the size and number of nuclear weapons exploded. The radioactivity could cause serious health damage or fatal injury to unprotected persons. In a nuclear attack, the blast, heat, and fire from the explosions would be very destructive, but the destruction would be in areas near the explosions. Radioactive fallout, though, could spread a thin layer over millions of square miles.
Radiation would come from the fallout wherever it settled -- the ground, trees and bushes, or the roof of your home. Fallout does not behave like a gas. In areas that would be affected by dangerous amounts of fallout, the fallout particles would look like dirt or hand and you may see them after they have settled on the ground or other places. The exact amount of radiation given off by the particles can be measured only by special instruments.
HOW CAN YOUR PROTECTION BE IMPROVED?
There are three ways of improving your protection against fallout -- time, distance, and getting some heavy material between you and the fallout (called "shielding").
1. Time -- Radioactivity decreases rapidly at first. After an attach, the radiation would be most intense during the first few days. Even so, radiation protection may be needed for an extended period -- days or weeks.
2. Distance -- The amount of radiation is less the further away you are from the source of radiation.
3. Shielding--Any material that is put between a person and the source of radiation cuts down on the amount of radiation that reaches the person. The thicker and heavier the material, the better the protection.
In the event of an attach, you have little control over time and distance, but YOU CAN DO SOMETHING TO IMPROVE YOUR PROTECTION BY MEANS OF SHIELDING.
It is the principle of shielding that is employed in fallout shelters. Under the guidance of the Office of Civil Defense, a system of fallout shelters is being developed throughout the nation. It consists of public shelters, private shelters, industrial and home shelters.
THE FALLOUT SHELTER SYSTEM
As a result of the National Fallout Shelter Survey, in which existing large buildings were examined and evaluated for fallout protection, space for millions of people has been identified. Those community shelters having a protection factor of at least 40 and space for at least 50 people are now being marked with a familiar black and yellow shelter sign. Where necessary storage space is available, they are being stocked with food, water (if needed), sanitary and medical supplies, and radiation detection instruments. The survey is a continuing effort. Through it, a current inventory is maintained of shelters added by new construction.
The fallout protection found in homes with basements represents important additional shelter space.
Personal and other special considerations may make fallout protection at home more practical and desirable than community shelters for certain individuals or families. For example, in rural and suburban communities and even in many cities, families may live a considerable distance from the nearest community shelter. For these families, a home shelter wi9ll provide more accessible fallout protection. Fallout protection at home is usually more accessible to housewives and young children during the day and may be preferred by the whole family when at home.
HOW MUCH PROTECTION DOES YOUR BASEMENT PROVIDE AGAINST RADIOACTIVE FALLOUT?
In homes, basement areas provide the best shelter against fallout because they are mostly belowground. This gives them a natural shield. This booklets tells you the amount of protection your basement offers and what you can do to increase this protection to provide your family's safety. Keep in mind that fallout shelter provides only limited protection against blast.
Look at the back of this booklet again. Two numbers are printed there which tell you the amount of fallout protection your basement offers. These numbers were calculated for your home by electronic computer from the information you gave in the recent Home Fallout Protection Survey questionnaire. The analytical model used is based on the best scientific information available. It was designed to give the maximum accuracy possible while requiring the minimum information from you. A more complex method might produce more precise results in some cases but would sacrifice simplicity, speed, and economy.
The numbers are given in terms of a "Protection Factor" or PF. This is the relation between the amount of fallout radiation which would be received by a completely unprotected person compared to the amount which would be received by a person in a fallout shelter. For example, a person in a fallout shelter with a PF of 40 would receive about one-fortieth (or 2½ percent) of the radiation he would be exposed to if he were completely unprotected. The higher the PF for your home, the more protection your basement affords against radiation.
The number in the box marked "center" (see back of your booklet) is the Basement Protection Factor (PF) calculated for the center of your basement. The other number is the PF calculation for the best corner of your basement. If your cover shows an X in place of either PF number, it means the PF is smaller than 10. Information on the box labeled "Added Weight," is on page 20 of this booklet.
WHICH IS THE BEST CORNER OF YOUR BASEMENT?
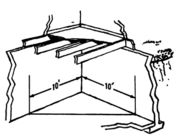
The best corner of your basement is the one which has the highest outside ground level--that is, the least amount of basement wall sticking up aboveground. In this corner make a triangle by measuring ten feet from the corner along each wall, and drawing a line between these points (see illustration).
The best corner protection factor listed on the back of this booklet means the average protection factor within the triangle is ablve this value. This 50 sq. ft. area provides adequate fallout shelter space for 5 persons; however, if necessary, several more persons could crowd into the corner area.
A smaller area could be used if equipment such as the furnace occupies part of the corner. If additional shelter space is required or the best corner is not usable, another corner having the next highest ground level to that of the best corner could be used. If all the corners have equal outside ground levels, the most convenient corner may be used, and of course all corners may be used.
The fallout protection afforded in the corner is better closer to the wall and closer to the floor. Therefor, you should liek on the floor next to the wall or sit on the floor with your back against the wall as much as possible. You may stand to stretch, and for essential needs, you can leave the forner shelter area for a few minutes.
WHAT ABOUT THE CENTER OF THE BASEMENT?
In nearly all basements, the highest protection factor is in the corner and lowerst in the center. This means the whole basement can be thought of as a fallout shelter with a protection factor in the center equal to the first PF number on the back of your booklet and a higher protection factor in the best corner equal to the second PF number.
STEPS YOU CAN TAKE TO INCREASE YOUR FALLOUT PROTECTION
If the protection factor in the best corner of your basement as indicated on the back cover is less than 40 and you wish to bring the PF up to the minimum recommended for a public shelter, then you need additional shielding. You can provide additional shielding for your basement by:
- . Permanent shelters -- By making part of your basement into a shelter area or by building a permanent shelter which might also serve other purposes. Listed on the back label are the plans recommended for your home.
- . Preplanned shelters -- By locating shielding materials so that you can complete a shelter quickly in time of crisis.
- . Improvised shelters -- by taking last-minute improvised actions if an emergency actually occurs.
A WORD OF CAUTION TO THE HOME HANDY MAN
Fallout Shelter Plans A through F which follow are so simple that you may be tempted to construct them from the drawings in this booklet -- and in many cases a thoroughly experienced "do-it-yourselfer" could do this. However, it requires very careful calculation of materials and fasteners to safely hold the heavy materials to be placed overhead; therefore, it is strongly recommended that you build from the detailed plans and lists of materials which are available by mailing the post card enclosed with this booklet.
PERMANENT SHELTER
Ceiling Modification To Basement -- PLAN A
NOTE: If too much of the basement wall is exposed, this plan will not provide sufficient protection and should not be used. The back cover of this booklets will indicate if this plan is recommended for YOUR home.
Here is a shelter which can be permanently installed in the basement of your home without affecting the use of the basement in any way.
All that is needed is a basement, some basic woodworking skills and approximately $165 for materials. The shelter can be accomplished while the basement is being built or it can be added to an existing basement by modifying the ceiling in the corner which furnishes the best protection.
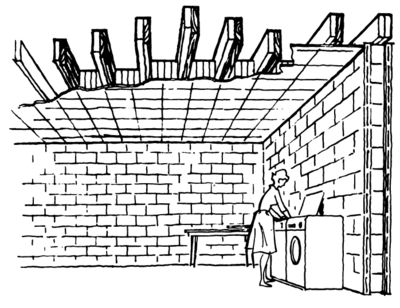
A significant amount of protection can be achieved merely by inserting heavy material in the ceiling above the best corner if this plan is recommended for your home. If this plan is not indicated on the back cover of your booklet, it can still be used by providing two additional masonry walls to enclose the corner of the basement. Fixtures and installation of ceiling tiles or walls will increase the cost a bit, but you will be able to achieve a significant amount of protection without interfering with the functions of the basement.
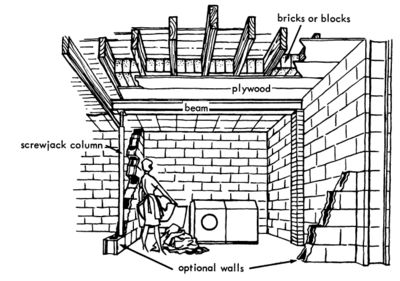
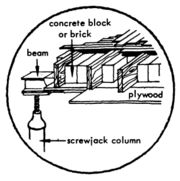
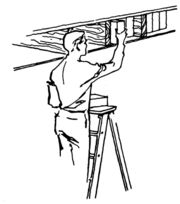
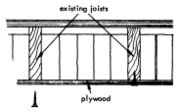
Because the basement area is almost all belowground level, you can increase the fallout protection by installing bricks or solid concrete blocks between the wood joists in the best corner. The filler materials are supported by sheets of plywood fastened to the floor joists. A beam and screw jack column may be needed to keep the floor joists from bending too much. A carpenter can tell you if this is needed.
Plywood sheets (2' x 8' x ½" cut to fit) should be securely fastened to the joists using 2 inch, #8 screws 10 inches apart. Bricks or blocks are then packed as tightly as possible into the openings between the two joists. Be sure to fill as much space as possible. To get the most protection out of this improvement, one-quarter of the ceiling over the best corner should be filled with bricks or solid concrete blocks.
To obtain detailed plans, see page 24.
In fastening the plywood sheets to the joists, nailing is not enough. Nails will pull loose. Use two-inch screws in the banner shown here.
PERMANENT SHELTER
Alternate Ceiling Modeification To Basement PLAN B
NOTE: If too much of the basement wall is exposed, this plan will not provide sufficient protection and should not be used. The back cover of this booklet will indicate if this plan is recommended for YOUR home.
If you need a minimum shelter which will not interfere with an existing corner of your basement, try this plan. It is so arranged that the shelter area can be enlarged at either end, depending upon the size of the basement.
This type of construction does not require a beam and screw-jack column to support the joists. The protected area can be used as a workshop, recreation room, pantry area, laundry room, or part of a family room. With ceiling tile covering the plywood panels, no one would recognize the area as a fallout shelter. Since the objective is to provide as much overhead mass as possible, the heaviest weight of solid brick or block (placed on an end if possible) should be used. If this plan is not indicated on the back cover of this booklet, it can still be used by providing two additional masonry walls to enclose the corner of the basement.
Wooden joists (2" x 12"), notched at the ends for bearing, are installed between existing floor joists. Plywood panels are then fastened to the 2" x 12" joists.
Brick or concrete blocks are packed into the spaces between the 10" and 12" joists; they are supported by the plywood panels.
This basement floor plan shows how the additional joists and the filler material might be used in the corner of the basement which furnishes the best fallout protection. To get the most protection out of this improvement, one-quarter of the basement ceiling should be filled with bricks or solid concrete blocks.
To obtain detailed plans, see page 24.
